Category: Setup

iPaper – Automated installation

An automated iPaper installation consists of the following parts:

  1. The installation of the version of GhostScript suitable for the iPaper version.
  2. Installing the iPaper application.
  3. Retrieve the license and activate the software.
  4. Configuration / distribution of the presets.

Normally our setups are executed as EXE. The EXE setup contains both the 32bit and the 64bit MSI of the application. With the EXE installation certain automated steps are executed automatically. The installation prerequisites (eg .NET Runtime, presence of the correct GhostScript version, etc.) are checked and if components are not available or not in the correct version, they are downloaded from the Internet and pre-installed. Likewise, the EXE setup decides whether on the computer the 32 or 64bit version must be installed.

Automated installation requires MSI installation packages. If the MSI packages are used, the installation prerequisites must be established correctly. It is also necessary to specify which version (32 or 64bit) has to be installed.

The “iPaperNET Client.exe” setup contains the required MSI files – but these must be extracted from the EXE.

Extract MSI from EXE:

  • /extract <path>Extracts the MSI contained in the EXE into the specified path. If the path contains spaces, it must be surrounded by quotation marks.
  • Beispiel: “C:\iPaperNET Client.exe” /extract “C:\temp” – This command-line command extracts the MSI to the folder “C: \ temp”

A description of the parameters can be found here >>>

Depending on the operating system, the 32 or 64bit GhostScript version must be installed – for iPapers up to version 2.99.1 the GhostScript version 9.18.1 is required.
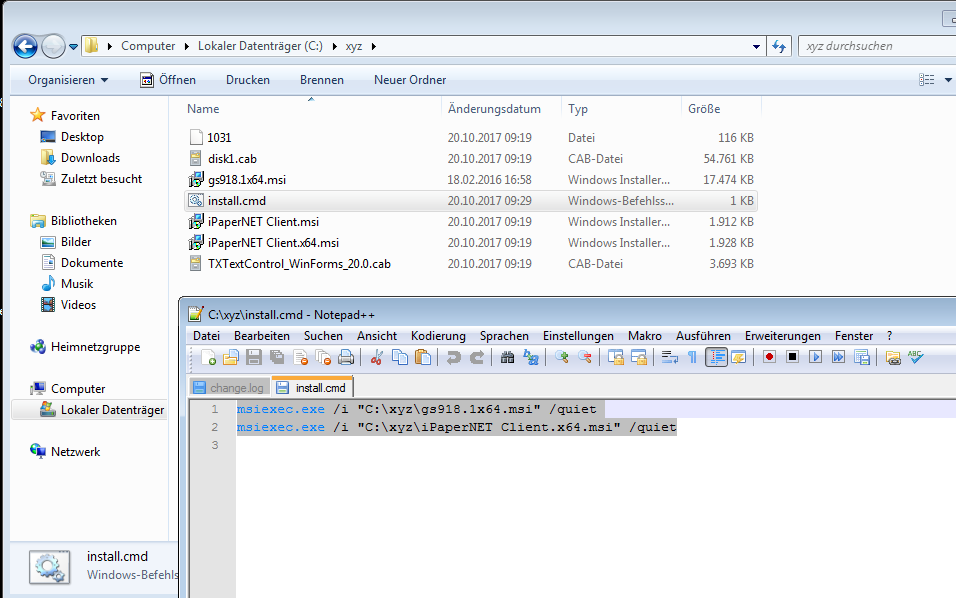
Example Extracting the MSI and installing 64bit versions:

  • “C:\temp\iPaperNET Client.exe” /extract c:\temp
  • msiexec.exe /i “C:\temp\gs918.1×64.msi” /quiet
  • msiexec.exe /i “C:\temp\iPaperNET Client.x64.msi” /quiet

Retrieve the iPaper License:

To retrieve the licenses from our license server, this can either be done interactively via the installed PAM (Product Activation Manager) or via Commandline

  • “C:\Program Files (x86)\Common Files\MAYComputer\LicMan.exe/ACTIVATE MULTI=“AUTO” USERID=“user” USERPW=“passwort” APPID=“2PC” /SILENT

In the example, “user” and “password” must be replaced by the PAM login information. The AppID “2PC” is used up to iPaper version 2.99.1.

iPaper Configure and distribute presets:

All settings of the iPaper application are stored in the iPaper.xml file in the default path (C:\Users\%user%\AppData\Roaming\iPaper.NET\iPaper.xml)

If it is not found there then:

  1. Checked if an iPaper.xml exists in the iPaper installation folder
  • If it is found there, we automatically copy it to the default path
  • If it can not be found in the installation folder, then 2.) is executed.

2. It is checked whether the xml file exists in the ProgramData directory C: \ ProgramData \ iPaper.NET \ iPaper.xml

  • If it is found there, we automatically copy it to the default path
  • If the file is not found there, an iPaper.xml file with predefined (fixed-coded) default settings is generated and stored in the standard path.

To specify default settings, we recommend variant 2.)

In the iPaper.XML you can use absolute path data or system variables.

Download – Example iPaper.XML

In this example, the system variables% HOMEPATH% and% APPDATA% were used. This makes general presets and actions which can be used universally for all users.

! Note that the iPaper.XML is always written / overwritten when you exit iPaper. So you have to replace the application before you want to replace it. Otherwise the file will be overwritten with the last values from the user interface when you exit iPaper.

An EXE – Setup can not be installed

We use EXE setups to be able to automatically check if all installation requirements are met. To uninstall old versions automatically, to automatically load the required programs in the correct versions or to decide whether a 32bit or 64bit version of the program should be installed on the computer.

For a few computers, it may happen that the EXE setup will not install and will display an error message that a process can not access a file.

Prozess kann nicht auf eine Datei zugreifen

To still be able to install the software, the MSI setup must be done in place of the EXE.

With the command /extract: <Pfad> (z.B.: Mypackage.exe /extract:”C:\My work”) can be extracted the MSI individual components from the EXE to the specified destination path and executed from there and so the software can be installed

Software-Setup´s – Message “invalid signature or corrupted cabinet file” – Code-signing certificates – SHA-1 and SHA-256

Since 01/01/2016 we received repeatedly the message that our software Setup’s can not be installed on certain systems. It happens when you run Setup, an error message “invalid signature or corrupted cabinet file.

Fehlermeldung signatur

It is because from 01.01.2016 no SHA-1, but only SHA-256 Certificates may be used for signing software. But not every old OS version supports SHA256 certificates.

OS support for SHA-1 and SHA-256

Info from Microsoft PKI Blog:

“Effective January 1, 2016, Windows (version 7 and higher) and Windows Server will no longer trust new code that is signed with a SHA-1 code signing certificate for Mark-of-the-Web related scenarios (e.g. files containing a digital signature) and that has been time-stamped with a value greater than January 1, 2016. This cut-off date applies to the code-signing certificate itself.

This restriction will not apply to the time-stamp certificate used to time-stamp the code-signing certificate or the certificate’s signature hash (thumbprint) until January 1, 2017. After this time, Windows will treat any code with a SHA-1 time-stamp or SHA-1 signature hash (thumbprint) as if the code did not have a time-stamp signature.”

What does that mean?
Any files signed with an SHA-1 certificate need to have a timestamp showing a date and time prior to Jan 1, 2016 for continued support. Those files will still be allowed through the ‘Mark-of-the-web” system until Jan 14, 2020, when all SHA-1 support will stop in all current versions of Windows. All new signatures created or timestamped after Jan 1, 2016 must be SHA-256 based signatures or they will cause a “digital signature is corrupted or invalid” error when downloading.

What versions of Windows support SHA-256 signatures?
SHA-256 signatures are not supported in Windows XP SP2 or earlier. SHA-256 is only supported in User Mode for Windows XP SP 2, Vista and Windows Server 2008R1 — SHA-256 certificates are not supported for drivers on any version prior to Windows 7.

Microsoft is announcing the availability of an update for all supported editions of Windows 7 and Windows Server 2008 R2 to add support for SHA-2 signing and verification functionality. Windows 8, Windows 8.1, Windows Server 2012, Windows Server 2012 R2, Windows RT, and Windows RT 8.1 do not require this update as SHA-2 signing and verification functionality is already included in these operating systems. This update is not available for Windows Server 2003, Windows Vista, or Windows Server 2008.

Workaround:
Please contact us in this regard, We then provide you with a setup without code signature. Then the software can be installed on “old” operating systems that do not support SHA-256 encryption.

MSI Setup – set language code manually

Sometimes it may be necessary to set the language code for the installation of an MSI setup manually. By default, the language setting of the system will be taken on which the software is installed. So there may be differences between the local installation of Setup and the installation, for example, the MS SCCM Server (System Center Configuration Manager). For the detection and automatic updates, it is necessary that the language code is unified. There is a dedicated MSI Parameter.

Example x86 German OS Version:
msiexec.exe /i “C:\InstallSetup\gs918.1×86.msi” Productlanguage=1033
1033 is the Code for English

Example x64 english OS Version:
msiexec.exe /i “C:\InstallSetup\gs918.1×64.msi” Productlanguage=1031
1031 it the Code for German

eDocPrintPro – uninstall without user input – “silent”

Beside the “silent” installation without user input it could also be necessary to uninstall eDocPrintPro – the normal version, the PDF/A version or GhostScript the same way. But you have to know the product code of the setup to execute the uninstall “silent”:

“msiexec” /qn /uninstall {<product code>}

Product code eDocPrintPro:

  • English installation: {EB0C0CC8-9BEB-4578-9960-CEE5399CA40A}
  • German installation: {72153E94-CAD9-42FF-9319-20823D92978C}

Product code eDocPrintPro PDF/A:

  • English installation: {ACDDA0E0-4FCF-414A-8DB2-8C00D85B8487}
  • German installation: {FD85B8BD-6497-4009-B528-00596F5D1B54}

Product code GhostScript x86  and GhostScript x64:

  • English installation: {6597A62D-8BD9-49EB-AAE6-DEDF417C68B1}
  • German installation: {344BD061-2564-422E-860F-9E5DC49983AE}
Webshop